

When you make a WordPress website, you’ll need to get a domain name, choose a web host, install and customize WordPress, and add your content. Read on to learn about building and maintaining your WordPress website.
Why Should You Use WordPress?
WordPress is generally an excellent choice for hosting your website. It’s one of the most popular methods for creating dynamic content for the web. Instead of learning a lot of code to create a website, you can launch a website without much technical ability.
Even if you are good at writing code, it’s still a quick method of getting content onto the web and updating it much easier. You can often get a site up and running in a few days or less.
Consider these reasons to use WordPress:
- It’s free: WordPress is a powerful, well-designed software suite that is free to get started with. Sometimes, prices are involved if you want to purchase a customized theme, and some plug-ins may have a fee.
- It’s easy to customize: You can always change the look and feel of your site with different themes and plug-ins with little or no technical knowledge.
- It’s SEO-friendly: WordPress helps you structure your site automatically with good headers to ensure you can be found, even without using plug-ins.
- It’s secure: As long as you are using the latest updates and plug-ins, you will be relatively safe from most attackers; however, you must be vigilant and keep your software and plug-ins current.
Step 1. Get a Domain Name
Your domain name is the official name of your website and how people will gain access to your site. Choose one from a domain name registrar and have it pointed to your web host. You can often get a domain name directly through your web host.
Step 2. Choose a Web Host
For your website to be accessible by internet visitors, you must host it on a server. You can host your site on WordPress.com, use your server — which is rare — or choose a web hosting company. There are many good choices, and almost all provide easy-to-use tools for putting your website online.
Step 3. Install WordPress
Some web hosts offer one-click WordPress installs, or you can install it yourself. Follow these steps to install WordPress.
First, you’ll need a local server with PHP ― the programming language that WordPress runs in ― and MySQL or MariaDB. If you don’t have this already, we recommend using XAMPP for local development. It’s simple to download and install and runs on Windows, Linux, and Macintosh.
Download WordPress from WordPress.org. Extract the file, and then copy the contents of the extracted file into a folder on your local server. For example, in XAMPP, it will typically be called htdocs. You can create a folder with whatever name you like, such as “htdocs\my_site.”
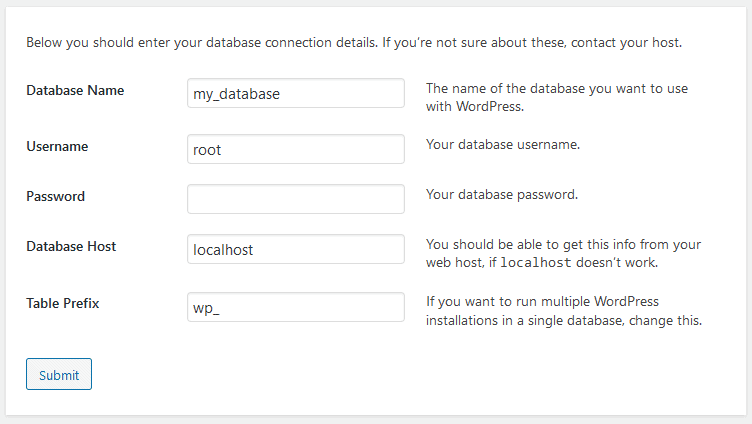
Next, you need to build a MySQL database. Do this via the command line or phpMyAdmin, which comes with XAMPP. You can get to this by going to http://localhost/phpmyadmin/ ― assuming you have it installed.
Create the database and note the information, including your database name. Then, navigate to whatever you call your folder. You will be prompted to follow the installation instructions below:
Follow the instructions on the next page to create a site name and username, and enter your email address. If you need to install WordPress on your web server, you can follow the same steps on the server. Many hosts have installers, making the process easy.
If you prefer to work locally after you have built your initial site, you can use file transfer protocol (FTP) to move the files into the desired directory. Then you create a database, enter the credentials, and install it. It’s that simple ― your site should be installed now.
Note: you may find it easier to work directly online on your web host, so you do not need to update the database manually. WordPress has a set of safety mechanisms to only publicly publish your chosen information. Your choice will vary based on your expertise.
Step 4. Customize WordPress
Once installed, you’ll need to select a WordPress theme, which can quickly update the look of your site. WordPress comes with several free themes, and you can purchase additional ones from the WordPress store, where artists, web designers, and developers have created templates for almost any option. You can access themes from the “Appearance” link on the left-hand side of your menu in the administration console.
Look for a responsive theme that will appear clean and readable to desktop and mobile users.
After your theme is set, select WordPress plug-ins, which are discrete pieces of code that can seamlessly integrate within your site to provide a wide range of functionality. This can cover everything from basic tools for managing the site to increasing search engine optimization (SEO) to improving the security of your WordPress site. Some examples:
- Contact form: This is an important part of your site. You may wish to install software that enables users to contact you via form, and WPForms is a good example of a form plug-in
- SEO plug-ins: Several good plug-ins, such as Yoast, help you manage your content in a way that will improve your search engine placement.
- E-commerce: If you plan to do any transactions through your site, you may want to use several e-commerce plug-ins on the market. WooCommerce is one of the most popular.
Step 5. Add Content
The most important part of your site is your content. No matter how pretty or cool your site looks, they won’t stay long if there’s nothing to engage people. Adding content in WordPress is handled by entering data into several prebuilt forms.
This is one of the advantages of using this platform. The back end of managing and creating a website is handled automatically, making maintaining your content simple.
WordPress sites enable you to create different pages. Most site visitors expect to find a standard set of pages, so it’s wise to create these. These include:
- Home page: This is the face of your website, so it needs to look good but also be easy to understand.
- About: People will look for a concise summary of your site and who you are, whether for a business or any other purpose.
- Contact: Provide a page where people can contact you, either via a form, email addresses, or phone numbers.
- Products and services pages: If you sell a product, provide these upfront, usually from your home page. If you are offering services, list these services with pricing (if possible) on your main page.
- Blog: One of the best ways of keeping your website up to date is to publish a regular blog post; WordPress was initially designed as blogging software, so this is easy to implement.
Frequently Asked Questions About WordPress
What is WordPress?
Are there any hidden costs to using WordPress?
Do I need to know how to code to use WordPress?
How do I change the look of my WordPress website?
How do I add new features to my WordPress website?
Can I edit my WordPress sidebar?
Learn More
- Beginner’s Guide: How To Start a Blog
- Best WordPress Hosting
- How Much Does it Cost to Build a Website?
- How To Build a Website in 9 Easy Steps